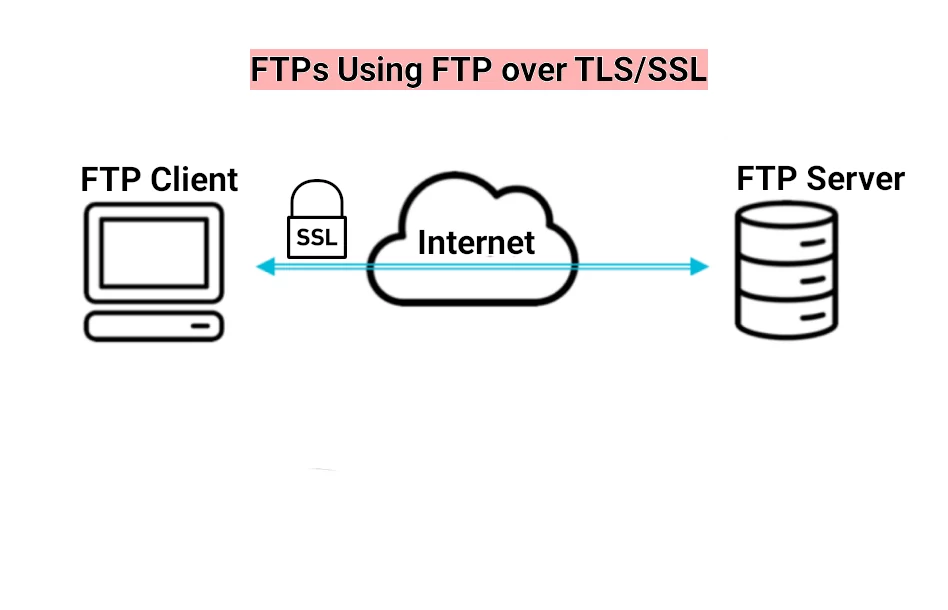
FTP Over TLS/SSL aka FTPs with VsFTP / Ubuntu
FTPs is also referred as FTP secure. As its name suggest, FTPs is a secured type of the file transfer protocol (FTP) with a support for Transport Layer Security (TLS) / its depreciated ancestor SSL (Secure Socket Layer) .
There is a difference between FTPs with SFTP. While FTPs is a FTP over TLS/SSL, sFTP is a transfer protocol providing secure access to a remote server leveraging SSH (Secure Socket Shell).
Install FTP Server Ubuntu with VsFTPd
FTP (File Transfer Protocol) has been around for many years. It specifies the protocol for transferring data over network/internet. Over the years it has become redundant. Surfers can download files through the web server using HTTP or HTTPs protocols. Developers and power users rely on sFTP and scp, because they are faster and secure.
Requirements for the FTP Server
Nevertheless, if you need FTP for any specific reason, vsftpd is a very good starting point for your FTP Server. This articles assumes that your server is Ubuntu 20.04 LTS “Focal Fossa”. Also we assume that we run the commands as a normal user who can can have the superuser privileges. As always start with updating the repositories and upgrading the necessary packages, if needed:
$ sudo apt update
$ sudo apt upgrade
$ sudo apt install vsftpd
After installing the server, the next step is to backup the configuration file.
$ sudo cp /etc/vsftpd.conf /etc/vsftpd.conf.backupOpen The Firewall Ports
At this point, if you already have a web server and a ssh server installed, if you type
$ sudo ufw status

To                         Action      From
--                         ------      ----
OpenSSH                    ALLOW       Anywhere
Apache Full                ALLOW       Anywhere
OpenSSH (v6)               ALLOW       Anywhere (v6)
Apache Full (v6)           ALLOW       Anywhere (v6)
Your output may vary, but since we have a FTP control and data ports, port 990 for FTP over TLS, and a range of ports for FTP passive mode.
sudo ufw allow 20/tcp
sudo ufw allow 21/tcp
sudo ufw allow 990/tcp
sudo ufw allow 10000:10050/tcp
Port 20 is the FTP data port, 21 FTP control port, 990 – FTP over TLS. The last line specifies a range of ports for use by the clients. How broad is the range depends on maximum number of concurrent FTP users you are expecting.
Now the output of the ufw status command would be:
$ sudo ufw status

OpenSSH                    ALLOW       Anywhere
990/tcp                    ALLOW       Anywhere
20/tcp                     ALLOW       Anywhere
21/tcp                     ALLOW       Anywhere
40000:50000/tcp            ALLOW       Anywhere
OpenSSH (v6)               ALLOW       Anywhere (v6)
20/tcp (v6)                ALLOW       Anywhere (v6)
21/tcp (v6)                ALLOW       Anywhere (v6)
990/tcp (v6)               ALLOW       Anywhere (v6)
10000:10050/tcp (v6)       ALLOW       Anywhere (v6)
Create FTP User
Whether you have or not a user for the ftp access, you can create a new one to test the server configuration. Here is a simple list of commands to go you thru the process of getting the server ready.
$ sudo adduser ftptestSet the password when prompted and press ENTER as you go trough the rest of prompts. If you want to change the password, use the command:
sudo password ftptestNow that we have a ftp testuser to play with, we can deep further and secure our FTP server.
Securing Ubuntu vsftpd Server
First step in securing the FTP server is to limit the user access. You do so by turning on the following command in /etc/vsftpd.conf. Use vim or nano to edit the file:
$ sudo chroot_local_user=YES
$ sudo chroot_list_file=/etc/vsftpd.chroot_list
Additionally, you can instruct the server to restrict the users included in vsftpd.chroot_list to their home directory. In our case the user ftptest will have access only to its home folder.
One more thing, disallow the anonymous access to the server, and allow the local users to be able to upload files to their respective home directories with the following commands in nano /etc/vsftpd.conf
nano /etc/vsftpd.conf
anonimous_enable=NO
local_enable=YES
Encrypt the Traffic with FTPs.
As I already mentioned, FTPs is only one of many ways to protect and encrypt your traffic. It is not even the newest and most reliable. For this to work you will need OpenSSL or LetsEncrypt. I am assuming that you are running this on a server with an already installed websites. Also I am assuming that you are running your websites on an Apache webserver. If so, you might already be familiar with the LetsEncrypt, a handy tool to generate a self- signed SSL certificate. You might already have the certificates generated with the command line below. They would be in the folder /etc/letsencrypt/live/mydomain.org/ :
$ sudo certbot --apache -d mydomain.org,www.mydomain.orgThis part of the /etc/vsftpd.conf should read:
.........
pam_service_name=vsftpd

# Paths to your letsencrypt files
rsa_cert_file=/etc/letsencrypt/live/mydomain.org/fullchain.pem
rsa_private_key_file=/etc/letsencrypt/live/mydomain.org/privkey.pem
ssl_enable=YES

#Explicitly deny anonymous connections over SSL
allow_anon_ssl=NO

# require SSL for both data transfer and logins:
force_local_data_ssl=YES
force_local_logins_ssl=YES

# configure the server to use TLS, the preferred successor to SSL
ssl_tlsv1=YES
ssl_sslv2=NO
ssl_sslv3=NO

# We don't ask for SSL reuse because many FTP clients won't like it.
require_ssl_reuse=NO
# “high” encryption cipher suites means we require key lengths equal to or greater than 128 bits:
ssl_ciphers=HIGH
When done, save, close the file and restart the service
sudo systemctl restart vsftpd
If you don’t have an webserver to generate the certificate, you can use certbot with a —standalone option. It will handle the challenge using its own built-in web server. Please, notice you will still have to allow either port 80 or 443 to fulfill the respective challenge:
sudo certbot certonly –standalone –preferred-challenges http -d mydomain.org
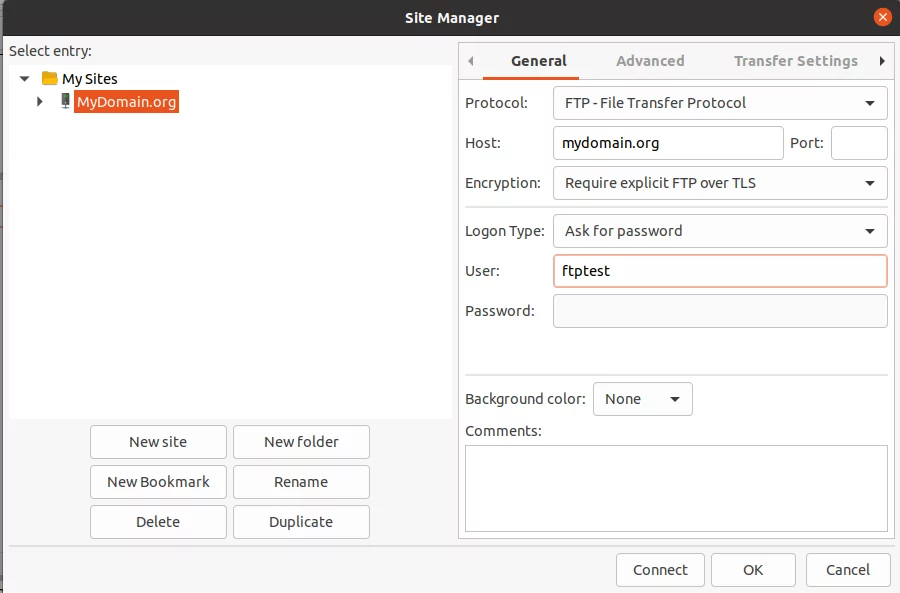
Testing the FTPs with FileZilla
I picked FileZilla for the test, because it is popular choice, cross- platform and I happened to use it as a FTP client. Fire up FileZilla and pick the drop-down menu ‘File- Site Manager’. Choose FTP as a protocol, then the name of the host/Ip address, port number 990. Encryption- Require explicit FTP over TLS. Then pick ‘Ask for a password’. Hit connect and enter the password.