Install mod_remoteip in Apache2
Install mod_remoteip Table of Contents
Why Using mode_remoteip in Apache2
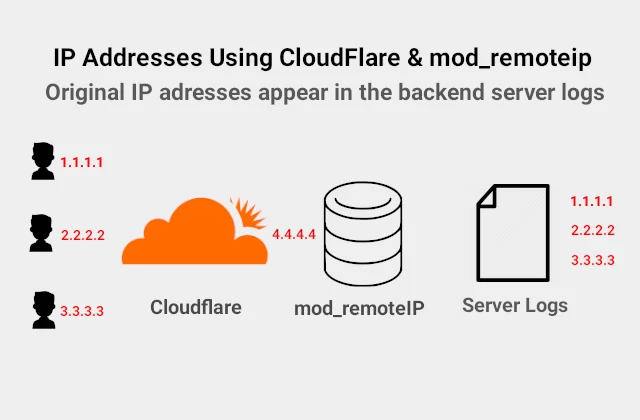
Mod_remoteip allows Apache2 to get the visitor IP from requests received from proxy servers and load balancers. It gives you the actual IP of the visitor. The origin server restores the actual information and logs the original visitor IP address instead of the proxy IP address.
This guide will explain how to install and setup mod_remoteip on Apache2 on Ubuntu (Debian) distribution in order to restore original visitors information from Cloudflare. Also, the older alternative, mod_cloudflare, which is not a part of the mainstream distributions, is included in the howto.
How to Get the Real Client IP Address from Cloudflare
CloudFlare is a popular content delivery network. Their free plan includes reverse proxy service which speeds up page load times and caches static resources. As a consequence, when logging requests, the backend server returns CloudFlare IP addresses. The original visitor IP address appears in an appended HTTP header called CF-Connecting-IP.
Additionally, the Enterprise plan of CloudFlare provides another HTTP header True-Client-IP to pass the original client (visitor) IP address to the origin web server. According to Cloudflare article database there is no difference between the two headers, they would carry the same information.
My first natural choice, due to the fact that it is an Apache module, is mod_remoteip. The module overrides the client IP address with the useragent IP address reported in the request header configured with the RemoteIPHeader directive.
Mod_remoteip Module Setup
- Enable module mod_remoteip by typing the following command and restart the apache
sudo a2enmod remoteip && systemctl restart apache22. For every virtual domain setup through CloudFlare add the RemoteIPHeader directive set to CF-Connecting-IP. If you want to add it to the default setup, edit nano /etc/apache2/sites-available/000-default.conf
ServerAdmin webmaster@localhost
DocumentRoot /var/www/html
RemoteIPHeader CF-Connecting-IP
ErrorLog ${APACHE_LOG_DIR}/error.log
CustomLog ${APACHE_LOG_DIR}/access.log combined
3. In Apache main configuration file apache.conf at the Log Format directives find and replace %h with %a. Type nano /etc/apache2/apache2.conf. The output would be similar to:
LogFormat "%v:%p %a %l %u %t \"%r\" %>s %O \"%{Referer}i\" \"%{User-Agent}i\"" vhost_combined
LogFormat "%a %l %u %t \"%r\" %>s %O \"%{Referer}i\" \"%{User-Agent}i\"" combined
LogFormat "%a %l %u %t \"%r\" %>s %O" common
LogFormat "%{Referer}i -> %U" referer
LogFormat "%{User-agent}i" agent
4. Add trusted proxy IP address(es) in the configuration file Define trusted proxy addresses by creating /etc/apache2/conf-available/remoteip.conf by entering the following code and Cloudflare IPs:
RemoteIPHeader CF-Connecting-IP
RemoteIPTrustedProxy 173.245.48.0/20
RemoteIPTrustedProxy 103.21.244.0/22
RemoteIPTrustedProxy 103.22.200.0/22
RemoteIPTrustedProxy 103.31.4.0/22
RemoteIPTrustedProxy 141.101.64.0/18
RemoteIPTrustedProxy 108.162.192.0/18
RemoteIPTrustedProxy 190.93.240.0/20
RemoteIPTrustedProxy 188.114.96.0/20
RemoteIPTrustedProxy 197.234.240.0/22
RemoteIPTrustedProxy 198.41.128.0/17
RemoteIPTrustedProxy 162.158.0.0/15
RemoteIPTrustedProxy 104.16.0.0/12
RemoteIPTrustedProxy 172.64.0.0/13
RemoteIPTrustedProxy 131.0.72.0/22
RemoteIPTrustedProxy 2400:cb00::/32
RemoteIPTrustedProxy 2606:4700::/32
RemoteIPTrustedProxy 2803:f800::/32
RemoteIPTrustedProxy 2405:b500::/32
RemoteIPTrustedProxy 2405:8100::/32
RemoteIPTrustedProxy 2a06:98c0::/29
RemoteIPTrustedProxy 2c0f:f248::/32
5. Next step is to test Apache2 configuration
$ sudo apache2ctl configtest
Syntax OK
6. Restart Apache2
sudo systemctl restart apache2Module Mod_Cloudflare Installation & Setup
Cloudfllare no longer supports and updates mod_cloudflare. However you can download its code from the GitHub repository.